Blackwork Embroidered Men’s 16th Century Shirt

20150222_212611

We all have that one friend that you should never wager against because luck will always favor them. I have that in my friend Braden. Two years of unsuccessful wagering led to my making him a handsewn and blackwork embroidered 16th century shirt.

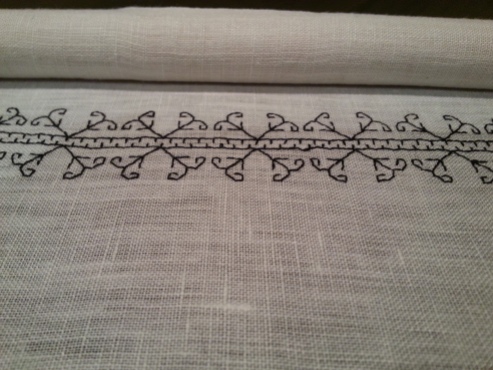
Materials Used: 5.3 oz white linen for the body of the shirt, 3.2 oz white linen for the embroidered cuffs and collar, black silk embroidery floss, 25 count waste canvas, wooden scroll embroidery frame, serger, sewing machine

I prefer to make my art as period correct as I possibly can, so I chose to use a design drafted from the Hans Holbein portrait of Henry VIII. The embroidery can be seen at the joining of the seams on Henry VIII’s shirt. I serged the edges of the linen, loaded the scroll embroidery frame, and spent about 100 hours or so embroidering the blackwork design on the cuffs and collar.

Once the embroidery was complete I used Braden’s measurements to cut out the body pieces and sleeves for the shirt from the 5.3 oz linen. I serged the edges of each piece to keep the linen from fraying and then used my sewing machine to sew the front 2 pieces of the shirt to the back piece, and to attach the sleeves. All other sewing was completed by hand. Because of the thickness of the linen I chose to fold each side of the seam onto itself and hand sewed them flat.

Once the shirt was assembled, I box pleated the fabric for the collar and cuffs. I used the sewing machine to attach the pleating to the embroidered pieces and then hand sewed the cuffs and collar on to the shirt.

After attaching the cuffs and collar, and flat felling all of the body seams, I attached hook and eyes to the collar and cuffs and then hand sewed the shirt hem. It was finally complete!

But of course this is where problems always happen. The shirt fit beautifully with the exception of the collar, which was about one inch too short. Thank goodness I ensured that there was extra material on the ends of the collar. I loosened some of the gathering in the collar and extended it to the needed length. My friend was very happy with the shirt and even wore it at the SCA 50 Year celebration.
Blue and Gold Damask Gown and Doublet

13247825_1064436036948667_3927472549515011183_o

Damask is one of the most recognizable period patterns, which is why I was so excited when I was at my local Joanns and saw an entire roll of a gorgeous blue and gold damask in the clearance bin. Little did I know that 2 years later I would come to regret that purchase and would actually dub poly-damask as the “Devil’s fabric.”

I’m a huge fan of matchy-matchy couple’s garb and there was enough of this fabric to outfit myself and my husband. While planning the outfits I had to address the usual questions: farthingale? tie-on or set-in sleeves on the dress? tie-on or set-in or no sleeves for the doublet? front lacer with a placket or side lacer or back lacer on the dress? cartridge or knife pleats? This is the part of the sewing process that I most enjoy and with this particular project the answers came easily. Since this garb pair was intended to be for court I needed to choose the “fancier” options. The skirt would be made long enough to accommodate a farthingale; the sleeves on my gown would be tie-on; the sleeves on Andy’s doublet would be sewn-in; lacing would be in the back (boy did this turn out to be a mistake); and of course the skirt required cartridge pleats. I usually line my bodices and Andy’s doublets with the same fabric as the exterior, but I chose to use a cream colored silk dupioni lining in order to conserve the damask fabric.

Drawing out my bodice pattern on the poly-damask gave me the first indication that this fabric would be miserable. I use a sharpie when I draw on fabric because it draws smoothly and doesn’t bleed. This fabric seemed to deform whenever the sharpie touched it. I finally got all bodice pieces and doublet pieces cut out and the real fun began as the fabric started to fray immediately. I use duck cloth as interlining and boy was I thankful for that when I started to pin the bodice together because I was able to use the duck cloth to force the poly-damask somewhat back into shape.

I machine sew all body pieces together, but I hand sew all finishing seams. This is a list of all hand sewing completed on this project:

Gown

  • The straps that were secured into the top front of the bodice
  • The skirt hem
  • The cartridge pleats
  • The cuffs on the sleeves
  • The lacing rings for the tie-on sleeves

Doublet

  • The skirting
  • The buttons


Final Thoughts on the Project

I truly did not enjoy this project. The fabric was a misery to work with, and even though the dress and doublet have been worn a half dozen times and practically soaked in lavender oil they still reek like formaldehyde. I don’t like how the bodice fits, I feel like when I sit down the front of the bodice almost jams me in the chin. The sleeves feel too large and even though I did not alter the pattern the bodice somehow lost 5 inches in circumference. In all honesty, once I complete my new court ensemble I will probably sell the gown simply because I hate it.

The doublet looks great on Andy, although even this gave me a couple of areas to alter. The cuffs on his sleeves are too wide and I was able to trim a couple of inches from the waistline of his pattern.

12828288_704570063016343_4657234440064537496_o13502947_1117214525017891_928352020715760166_o

Heraldic Handkerchiefs

The Barony of Loch Salann’s Needleworker’s Guild decided to embroider drawn thread handkerchiefs for the lovely Baroness Amanda to distribute as largesse. I was responsible for embroidery the ones intended for the Queen of Artemisia at the time we began the project, HE Mistress Esther bat Baruch, and the Princess HRH Vigdis. In one corner an ermine spot (the symbol for the Barony) was to be embroidered with the arms of the intended recipient embroidered on the opposing corner. The handkerchiefs were a wonderful linen constructed by Mistress Bethoc. I used Splendor silk embroidery floss for all of the embroidery.

Esther’s hedgehog was especially fun to embroider.

13501832_1191625944195180_5017766010220879268_n

All of the embroidery was completed using a chain stitch, a wonderful stitch to outline as well as fill in an area.

Vigdis’s ram really shows off how beautiful chain stitch can be.

13438810_1191625877528520_6029891462371420517_n

Norse Underdress

I created this white linen Norse underdress for HRM Helene of Avacal.

DSCF1764

I was able to use one of her existing underdresses to create the pattern. The underdress consists of two separate pieces, the front and the back. Seams are located on the shoulders, and along the sides. The pattern includes built-in gores.

Because of time constraints I chose to use a serger to sew the underdress together, but did finish the cuffs, neckline, and hem by hand.

I did some basic research on what type of decorations would be used on Norse underdresses. It appeared that the really impressive embroidery would be reserved for the overdress (apron dress), while more practical embroidery was used on an underdress. The herringbone stitch was commonly used as it could be decoration as well as a stitch that could be used for hemming. One of Helene’s favorite colors is red, so I decided to use red linen embroidery floss for the herringbone.

DSCF1765

Sleeve detail

DSCF1769

Close up of the sleeve embroidery

DSCF1770

Neckline embroidery

Golden Scarf Scroll

A Golden Scarf scroll based on the Hastings Hours.

Basic layout, starting to paint the flowers.

DSCF1721

Flowers and acanthus painted, and flowers outlined.

DSCF1723

Background filled in, still needs clean up and final lining.

DSCF1724

Clean up and final lining complete.

DSCF1727

Completed scroll, awaiting the signatures of Their Majesties.

Andy’s Teal Linen Doublet/Historical Sew Fortnightly 2016 Challenge #1

12484844_795153947263416_7301511332835605934_oDSCF1745
The Challenge: Procrastination
 
Material: Lining and outer fabric – teal linen; interlining – duck cloth; metal buttons; Gutterman all-purpose thread
 
Pattern: Pattern drafted by me and based on mid-1500s men’s doublets
 
Year: 16th century England
 
Notions: Black Sharpie, sewing needle, see-thru ruler
 
How historically accurate is it?: The fit could be snugger, but is patterned based on the wearer’s personal preference. All of the body construction and buttonholes was completed using a sewing machine, but the skirting and buttons were handsewn
 
Hours to complete: 30
 
First worn: Barony of Gryphon’s Lair 12th Night (January 9, 2016)
 
Total cost: Linen $50, duckcloth $15, thread $6, buttons $20. Luckily I was able to source all of these items from my stash